|
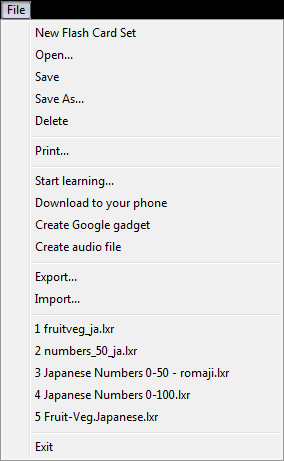
- Starts a new flash card set
- Opens an existing set for editing
- Saves changes for the current set
- Saves the current set with a different file name
- Deletes this flash card set. The deleted set may be retrieved from the Recycle Bin.
- Prints the flash card set. You will have the option to set the size of the cards in inches. The cards are printed one below the other, with
the sides next to each other on the same side of the paper, so you will require some real cutting and pasting. Please note the background
color is not retained during printing.
- "Start learning...": Opens the flash card set into the Flash Card Presenter so you can start learning on your computer.
- "Download to your phone": Use this option to load your flash card set onto your cell phone
This works by converting your
set into a web page that you can set through from your phone's internet
browser. If your phone allows it it's a good idea to save the page
onto your phone's memory so you don't have to connect to the internet
every time.
You may have problems with your WAP provider not allowing large
pages through, or your phone can't display them. So be aware
you may need to limit the number of cards you have in your set.
To use this option first
connect your computer to the internet, select the menu option
and wait for the set to be uploaded to the website. A dialog box
will then display telling you the address you can enter into your
phone to access the set. You'll have three choices of files to load
into your browser: a JavaScript HTML file, plain HTML file or a WML file.
The JavaScript version will only work if you have allowed JavaScript
to run on your mobile. This is the preferred version as you will have
access to all the features that the Presenter provides (except audio).
The other versions are provided if you have difficulties with this file.
Uploading your set to your
phone does support images (provided your phone can display them),
however audio tracks can't be uploaded.
The uploaded page displays one side of the card at a time along with a
normal web page link
to control the operation. The link labelled "Flip" will be
highlighted on the A side/Question side, pressing Select/OK on your
phone will take you to the B/Answer side. A "Next" link is then displayed
to indicate that pressing Select/OK will take you to the next card.
- "Create Google gadget": Creates a browser based gadget that will be uploaded to your own private online
library and which you can add to your iGoogle home page if you have one. You can then learn your flash cards
from anywhere you have access to the internet rather than requiring the L.A. Flash Cards Presenter software.
Click here for more info.
- "Create audio file": If you have included audio into your flash card set, you can create a WAV or MP3 file
based on this audio. This would be most useful when you have audio for each side
of the card, you can then use your iPod or portable MP3 player to learn
your card set anywhere.
- "Export": Exports the card set (without audio and images) to an external file for use in other applications.
You can specify Unicode on the export, and whether to include the BOM. The BOM stands for Byte Order Mark and
some applications may require it when reading a Unicode file.
- "Import": Imports a text file to create a flash card set. For another way of importing
question and answer text into the Creator from an Excel spreadsheet, Microsoft table or tab separated text, see the menu option
Edit=>Paste from Excel/Word Table below. You can specify Unicode or plain text. You
may require Unicode if you need to import non-Western characters, such as Japanese, Chinese, Arabic etc. The BOM
doesn't need to be specified on the import, it will automatically be detected.
- Displays a list of recent sets that you have been using
- Exits the Creator
|
|
|
|
|
|
|
|
|
|
|
|
|
|
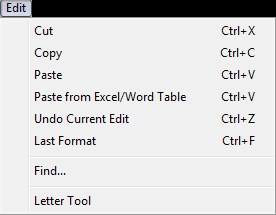
- Cuts the currently selected text into the clipboard.
- Copy the selected text into the clipboard
- Pastes the clipboard contents into the currently selected card side.
- "Paste from Excel/Word Table": If you have some questions and answers set up in an Excel spreadsheet, or in a Microsoft Word table (assuming a two column table)
or even just tab separated text, then try pasting it into the left side of a card. Multiple cards will be created for each row of your table, retaining its format.
- Undo the current edit.
- Repeat the last character format performed.
- Open the letter tool which allows you to enter accented and other European letters.
To enter these characters you can also use the Microsoft International Keyboard
or try the Start menu => All Programs => Accessories => System Tools => Character Map
|
|
|
|
|
|
|
|
|
|
|
|
|
|
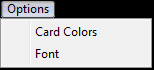
- Opens a dialog that allows you to change the background color of the
cards. You can change the color of the currently selected card
(you may need to remove the image and click into the card to
determine this),
or change the color of either side of all cards. Doing the latter
will also set the default color for that side.
- Opens a dialog that allows you to change the font and text color of
the card text. You can set these for the currently selected card,
or change them for either side of all cards. Doing the latter
will also set the default font and text color.
|
|