|
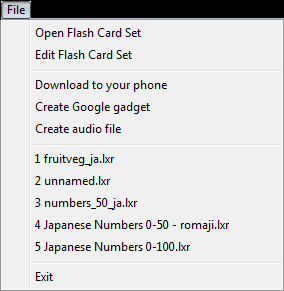
- Opens another flash card set for learning.
- Opens the current set into the Flash Card Creator for editing.
- "Download to your phone": Use this option to load your flash card set onto your cell phone
This works by converting your
set into a web page that you can set through from your phone's internet
browser. If your phone allows it it's a good idea to save the page
onto your phone's memory so you don't have to connect to the internet
every time.
You may have problems with your WAP provider not allowing large
pages through, or your phone can't display them. So be aware
you may need to limit the number of cards you have in your set.
To use this option first
connect your computer to the internet, select the menu option
and wait for the set to be uploaded to the website. A dialog box
will then display telling you the address you can enter into your
phone to access the set. You'll have three choices of files to load
into your browser: a JavaScript HTML file, plain HTML file or a WML file.
The JavaScript version will only work if you have allowed JavaScript
to run on your mobile. This is the preferred version as you will have
access to all the features that the Presenter provides (except audio).
The other versions are provided if you have difficulties with this file.
Uploading your set to your
phone does support images (provided your phone can display them),
however audio tracks can't be uploaded.
The uploaded page displays one side of the card at a time along with a
normal web page link
to control the operation. The link labelled "Flip" will be
highlighted on the A side/Question side, pressing Select/OK on your
phone will take you to the B/Answer side. A "Next" link is then displayed
to indicate that pressing Select/OK will take you to the next card.
- "Create Google gadget": Creates a browser based gadget that will be uploaded to your own private online
library and which you can add to your iGoogle home page if you have one. You can then learn your flash cards
from anywhere you have access to the internet rather than requiring the L.A. Flash Cards Presenter software.
Click here for more info.
- "Create audio file": If you have included audio into your flash card set, you can create a WAV or MP3 file
based on this audio. This would be most useful when you have audio for each side
of the card, you can then use your iPod or portable MP3 player to learn
your card set anywhere.
- Displays a list of recent sets that you have been using
- Exits the Presenter
|
|
|
|
|
|
|
|
|
|
|
|
|
|
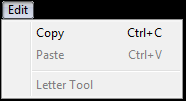
- If you have the "type answer" option set (of the testing mode), cut the selected text into the clipboard.
- Copy the selected text into the clipboard
- If you have the "type answer" option set (of the testing mode), paste the clipboard contents.
- Open the letter tool which allows you to enter accented and other European letters in test mode.
To enter these characters you can also use the Microsoft International Keyboard
or try the Start menu => All Programs => Accessories => System Tools => Character Map.
|
|
|
|
|
|
|
|
|
|
|
|
|
|
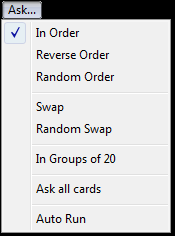
- The default mode which is to present the cards in the order they
were created in
- Presents the cards in the set in the reverse order they were
created in
- Presents the cards in a random order. See the note for 5 below.
- Swaps the sides of the card around so that the B side, or answer side,
is initially presented, and then the A side is shown. Useful for language
learning to practice translating backwards and forwards.
- Randomly swap cards. You may notice when using flash cards your
mind will become a little lazy and remember something only because it
follows on from another card. This is like being able to remember a sequence
of notes in a tune only when you have heard the earlier notes. The
usefulness of the random swapping and shuffling the order of cards lies
in breaking up this pattern learning and enabling you
to focus and pay attention to the card itself, rather than its
context.
- If your set is too large to easily learn, you can break it up
into groups until you know it well enough.
- Select this option if you want to review the cards you have previously
marked as "Don't Ask Again".
- Setting this option will automatically run through the cards without
having to press any buttons. You will be given an option to set the delay between cards.
|
|
|
|
|
|
|
|
|
|
|
|
|
|
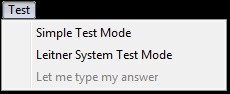
- Simple Test mode will test you on each card in turn. You can either
just press a button to indicate that you knew it or not, or
type the answer in by setting the option below. A bar graph at
the bottom will keep track of your progress.
- The Leitner System (see
wiki/Flashcard
allows you to learn with more efficiency and exercises both your short
and long term memory. Basically it works by recognising that you
know, or don't know, the flash card and presenting that card to
you less or more often respectively.
We have given each of our 5 Leitner groups a name to
indicate your knowledge level. This is shown at the bottom of the
screen, they are "New Word", "Short Term", "Recognize", "Familiar"
and "Know It!".
Again, you can either
just press a button to indicate that you knew it or not, or
type the answer in by setting the option below.
- In test mode you can type your answer into the lower
area and press the Enter key for the system to check your answer.
Otherwise you will be presented with a Right
 button or a Wrong button or a Wrong
 button to press. button to press.
The program will try and determine the best side of the flash card
to present to you as the "question", i.e. the sides with the shortest
text. If this is not correct you
may need to "Swap" in the Ask menu. To enter accented characters
such as é you can use the Letter Tool or the standard
Windows
International keyboard method.
|
|
|
|
|
|
|
|
|
|
|
|
|
|
- Shows both sides of the card on the screen, first the A or Question
side at the top, then the B or Answer side on the bottom.
- Shows only one side of a card at a time.
|
|
|
|
|
|
|
|
|
|
|
|
|
|
-
Turns on or off the automatic playing of audio.
|